
Never Lose a Track Again: Automating Cloud Backups for Music Producers

*As an upfront disclaimer, this guide is primarily for Windows users. The solution is built around utilizing the ROBOCOPY command and Windows Task Scheduler to automate scheduling of this command. Some of this guide should still apply conceptually, so feel free to read along whether you are a Windows user or not. If you are not, hopefully I can still point you in the right direction.
For macOS users: look into using the rsync command with launchd to automate scheduling.
For LInux users: look into using the rsync command with cron to automate scheduling.
Before Disaster Strikes
As a creative, few things are more devastating than losing a project you poured countless hours into. Now imagine losing months, a year, or even multiple years of your life's work in an instant.
Unfortunately, some things in life are certain: death, taxes, and hard drive failures. With hard drives having a limited lifespan, data loss is a matter of 'when,' not 'if,' making it crucial for us to make a reliable backup plan for our most important data.
I've been making music for nearly 15 years, and while I've mostly managed to keep my data safe, I've faced my share of hard drive crashes. With the average lifespan of a physical hard disk drive being only about five years, it's inevitable that you'll encounter failures. I've been fortunate to recover data in some cases, but there were times when I lost everything. Those experiences taught me to take backups seriously, and I don't believe everyone should have to learn through failure firsthand. That's why I'm sharing this guide—to help you get ahead of the curve before disaster strikes.
Step 1: Choosing a Cloud Service
*If you already have a cloud storage solution that is integrated with your Windows File Explorer, feel free to skip ahead to the next step if you just want the instructions.
Why the Cloud?
When it comes to data backups, you will hear over and over that you should buy an external hard drive. This is constantly touted as the solution for backups. While external hard drives or secondary internal drives are often recommended for backups, they come with risks. Physical backups are still vulnerable to disasters such as: flooding, fire, theft, or loss; and all drives eventually fail. Cloud storage offers an additional layer of security by keeping your data separate from your physical location. The best approach is a combination of both, providing redundancy and peace of mind.
Another great bonus of having files on the cloud means you can access them across many devices. From the perspective of a music producer, this means I can work on a song on my computer and back up the project to the cloud, continue working on it from a laptop on the go, and then go into my car and test out the mix of my rendered song through my phone, never once having to manually send files around or connect devices with cables to transfer anything.
Can’t the Cloud Fail Too?
You may have heard or read horror stories of people who say they had all their content or photos or files backed up in the cloud, and then some critical error occurred on Microsoft or Google or Apple’s end, after which all of their files were lost. This is possible, however, there’s a key aspect of this story that is left out. If you suffer data loss from a cloud failure, it means your data was online-only, and ONLY saved on the cloud.
While cloud storage can protect against physical disasters, it's not infallible. If your files are stored exclusively online, a service outage or data corruption could result in loss. That's why this guide focuses on making backup copies to the cloud while retaining local versions, ensuring your data is protected on multiple fronts.
Every cloud service has different indicators to tell you if the files you have stored are cloud only, or local as well. For example, Microsoft OneDrive has status icons directly in File Explorer that indicate where the file is stored:
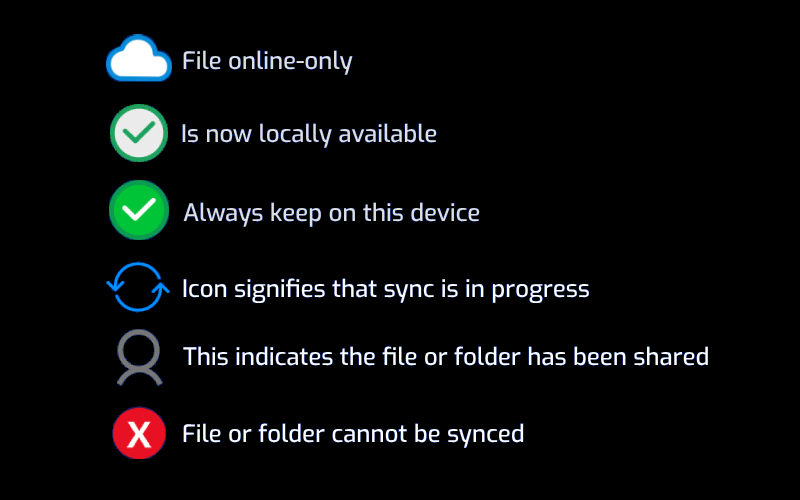
OneDrive Statuses
It is your duty to understand how your chosen cloud storage service works, and to understand whether or not the files you store there are online-only cloud copies and thus at-risk if there is a cloud level failure, or an online copy of something that you also have locally available on your machine or device.
What Cloud Service is Best?
This is an area that will likely spark a lot of heated opinions, so for the sake of this guide, I will try to be as agnostic as possible, as it ultimately comes down to personal choice. No matter what choice you go with, you will want to install the desktop version of the cloud storage service so that you can integrate your cloud storage direct with your File Explorer, or in other words have a mapped drive version of your cloud storage that you can browse to as a file path (necessary for scripting later).
Below is a table of popular cloud services with a basic breakdown of storage amount and costs at different tiers, and relevant links for pricing, downloads, and guides on how to integrate your cloud solution with Windows File Explorer.
| Cloud Service | Free Tier | Basic Tier | Premium Tier | Pricing Plans | Desktop Download | How to Integrate With File Explorer |
|---|---|---|---|---|---|---|
| Microsoft OneDrive | 5 GB | 100 GB @ $1.99/month | 1 TB @ $6.99/month | Link to Pricing | Link to Download | Already Integrated | Google Drive | 15 GB | 100 GB @ $1.99/month | 2 TB @ $9.99/month | Link to Pricing | Link to Download | Link to Guide | Apple iCloud+ | N/A | 200 GB @ $2.99/month | 2 TB @ $9.99/month | Link to Pricing | Link to Download | Link to Guide | DropBox | 2 GB | 2 TB @ $11.99/month | 3 TB @ $19.99/month | Link to Pricing | Link to Download | Link to Guide |
There are more cloud services than what I listed above, so please feel free to shop around. I personally use Microsoft OneDrive, as it already integrates directly with Windows File Explorer. This is what works for me, but again, if you have a different preference, please use what works for you. Before moving to the next step, make sure you have some sort of cloud option that you can see in Windows File Explorer (Win + E).

Notice here that I have the options of both Microsoft OneDrive integrated by default and Google Drive manually integrated as my (F:) drive.
Once you have decided on a cloud storage option for yourself (free or paid) and have gone through the steps to integrate it with your file explorer, you are now ready to get started on setting up your script for automated backups.
Step 2: Setting up a ROBOCOPY Script
The solution to bulk copying of data is much simpler than you may expect. While the tech savvy may go the extra mile to buy extra internal hard drives and dive into their PC’s BIOS menu to set up some sort of RAID array for mirroring of hard drives, we are not concerned with going to that level for this guide. RAID arrays are a great solution if your goal is to mirror an entire hard drive to another, but for many of us, we may just be concerned with backing up just the most important folders or files. Cloud backups are also a much cheaper and economic way for users to set up automated backups.
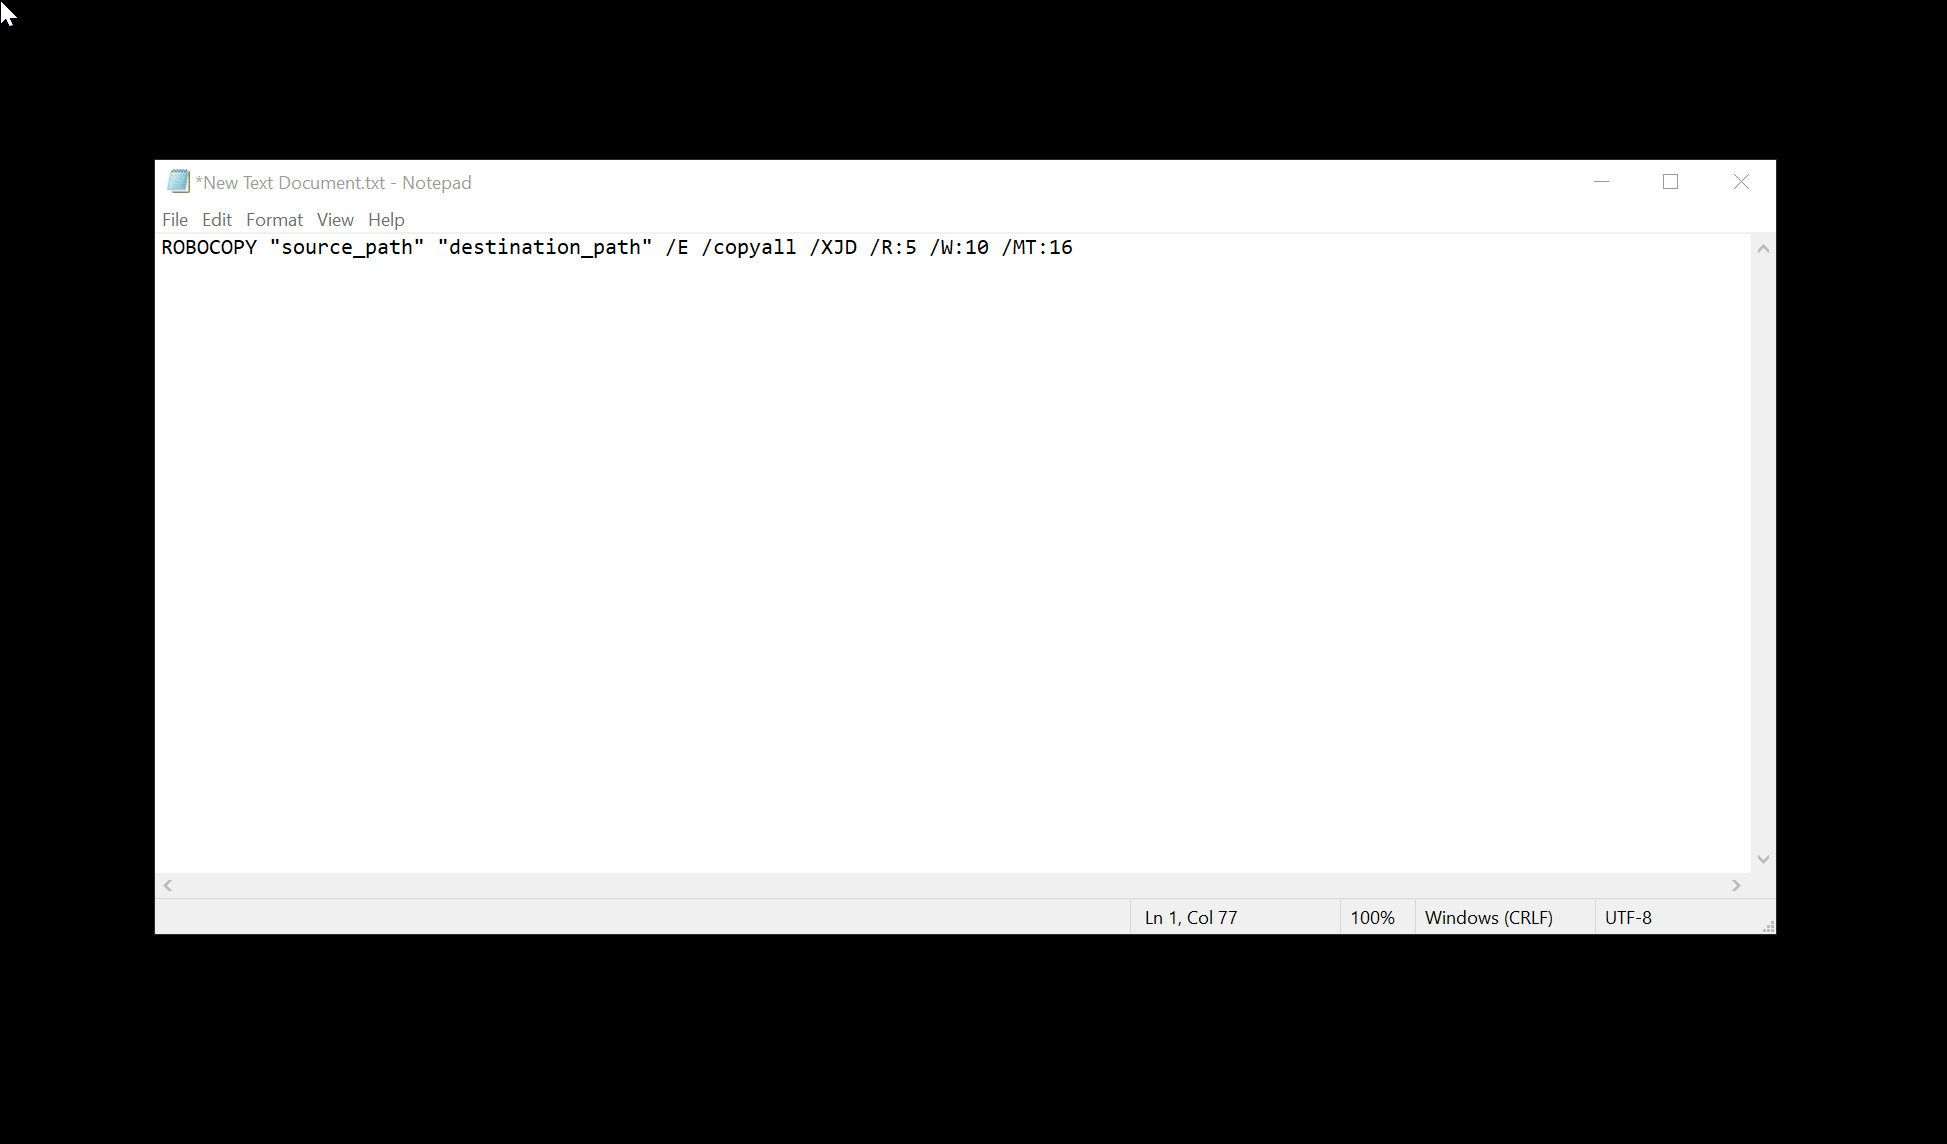
Windows has a simple but powerful command for this, known as ROBOCOPY (Robust File Copy). There are some extra features unique to ROBOCOPY that are not found in COPY or XCOPY, but one of the primary benefits is it supports multithreaded copying, which uses more of your CPU than a standard COPY command line, allowing you to move entire gigabytes of data in seconds. Below is a ROBOCOPY command line template where editable parameters are colored, as well as an explanation of the switches if you are interested.
The Code
Breakdown of /Switches
/E = copies everything including subdirectories (subfolders, including empty ones).
/copy:DAT = copies basic file attributes, including: (D) data, (A) attributes, and (T) timestamps
This does not copy security permissions, ownership, or auditing information, making it a more lightweight copy compared to
/copyall.
/XJD = Excludes junction points for directories (this includes symbolic links and shortcuts, so prevents copying data in shortcut linked folders).
/R:<n> = Specifies the number of retries on failed copies. The default value of n is 1,000,000 (one million retries).
/W:<n> = Specifies the wait time between retries, in seconds. The default value of n is 30 (wait time 30 seconds).
/MT:<n> = Creates multi-threaded copies with n threads. n must be an integer between 1 and 128. The default value for n is 8.
Script Instructions
Open Notepad or any empty text file editor.
Copy and paste the above ROBOCOPY code into Notepad, and change out source_path and destination_path leaving the quotation marks in place.
source_path = full folder path that you want to backup
destination_path = full folder path that you want copies of your files backed up to
The quotation marks are necessary to preserve the full string of text of your path in case your path contains spaces, i.e. “..\FL Studio 24\”.
Save your file to a location you are okay to keep your script permanently, saving with the file name ending as .bat to save as a batch file instead of a plain text file.
Run your batch file to test that it works and your files copy. Make sure it works as you intend before moving onto automated scheduling.
IMPORTANT: Make sure you have enough storage space at your destination path to cover the size of data you plan on copying before starting the script!
Saving a Batch File
Basic Troubleshooting
To keep Command Prompt open and view live results, add Pause at the end of the script. This will keep the window open until you press a key to exit. Be sure to remove Pause before resaving your batch file and scheduling the script, as it will cause the automated job to get stuck in a 'Running' status.
For logging, add /log+:log.txt to the end of your ROBOCOPY line to save a record of copied files. This appends the results to the specified log file (i.e. log.txt), which will be saved in the same location as your batch file. You can run multiple ROBOCOPY commands in the same script and use /log+ to keep all logs in one file. Example with custom log file name “robocopy_log.txt”:
ROBOCOPY "source" "destination” /E /copy:DAT /XJD /R:5 /W:10 /MT:16 /log+:robocopy_log.txt
ROBOCOPY "source2" "destination2" /E /copy:DAT /XJD /R:5 /W:10 /MT:16 /log+:robocopy_log.txt
Example Case
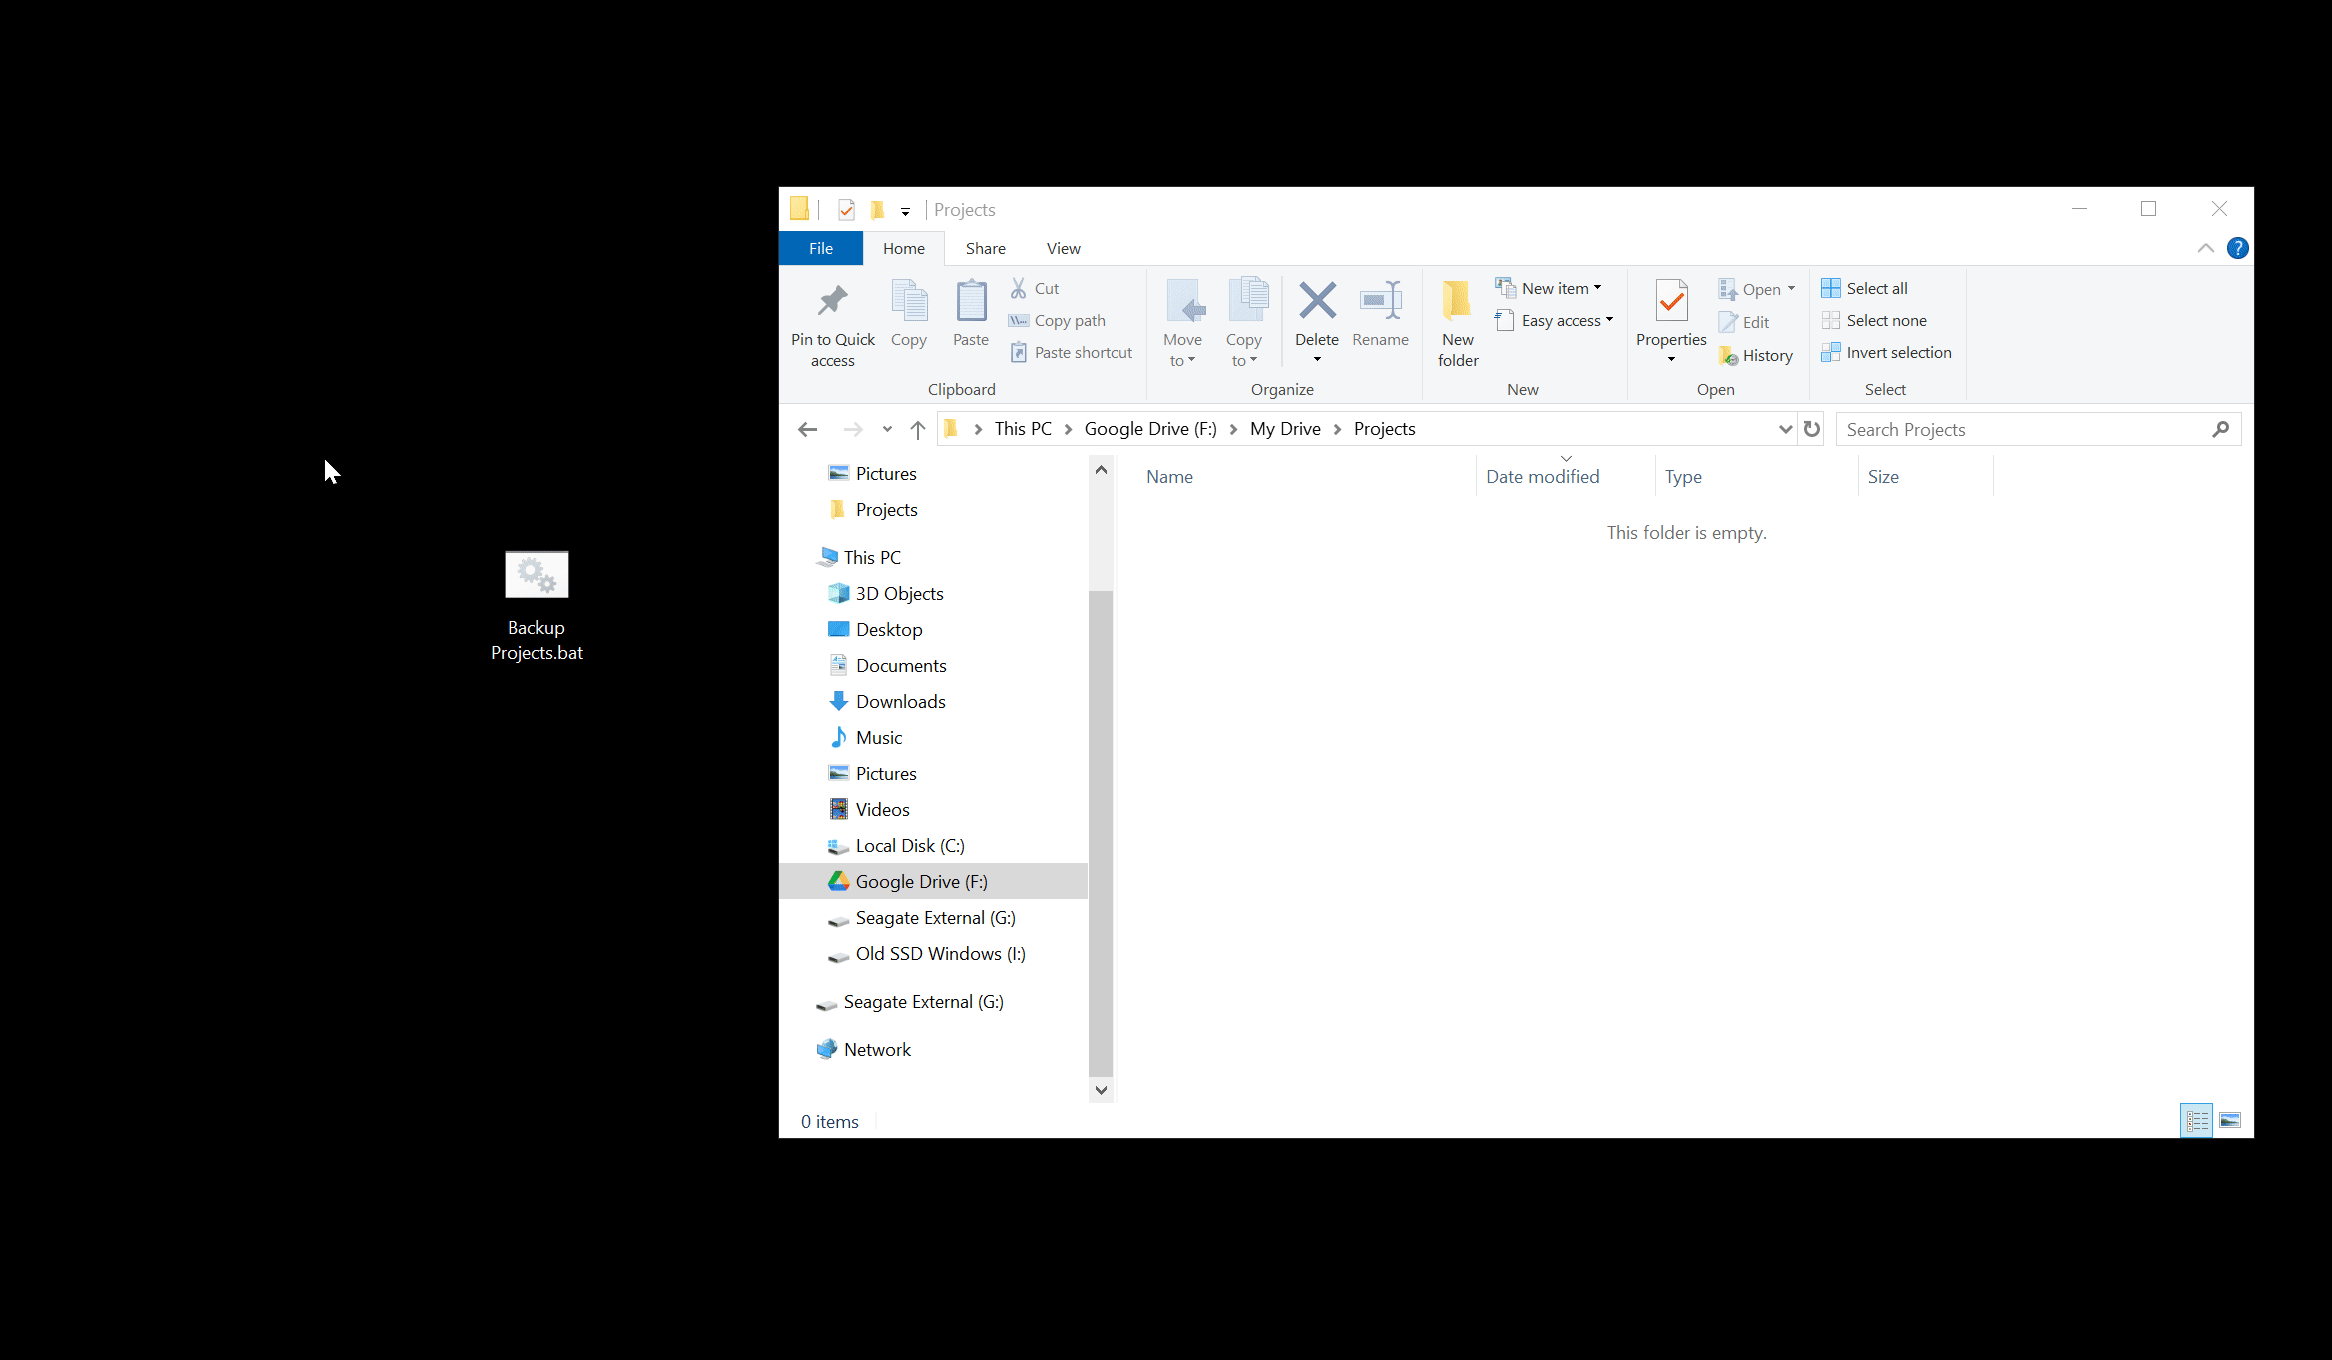
Here’s an example that I have set up. I am copying my FL Studio 24 Projects folder to a folder that I created called ‘Projects’ on my Google (F:) Drive.
ROBOCOPY "C:\Program Files\Image-Line\FL Studio 24\Data\Projects" "F:\My Drive\Projects" /E /XJD /R:5 /W:10 /MT:16
I copied the above into a text file, saved it onto my desktop as ‘Backup Projects.bat’. Below is a live screen capture of what it looks like running the script, moving nearly 2 GB of data in less than 15 seconds.
ROBOCOPY in Action
Multiple ROBOCOPY Commands In One Batch File
This script can copy files from any source to any destination, whether cloud, internal, or external drives. You can run multiple ROBOCOPY commands in a single .bat file, allowing you to back up different folders to various locations in one go.
For example, you could save all of the following into one .bat batch file to back multiple source folders into multiple destination paths:
ROBOCOPY "C:\Program Files\Image-Line\FL Studio 24\Data\Projects" "F:\My Drive\Projects" /E /XJD /R:5 /W:10 /MT:16
ROBOCOPY "C:\Program Files\Image-Line\FL Studio 24\Data\Projects" "G:\My External\Projects" /E /copy:DAT /XJD /R:5 /W:10 /MT:16
ROBOCOPY "C:\Program Files\Image-Line\FL Studio 24\System\Config\Piano roll scripts" "F:\My Drive\Piano Roll Scripts" /E /XJD /R:5 /W:10 /MT:16
ROBOCOPY "C:\Program Files\Image-Line\FL Studio 24\System\Config\Piano roll scripts" "G:\My External\Piano Roll Scripts" /E /copy:DAT /XJD /R:5 /W:10 /MT:16
Step 3: Setting up Automation with Windows Task Scheduler
Now it’s time for the homestretch, to set things up so that your batch file will run every single day automatically for you at a time of your choosing. To set this up, we will be using Windows Task Scheduler, a system app already included on Windows.
Instructions
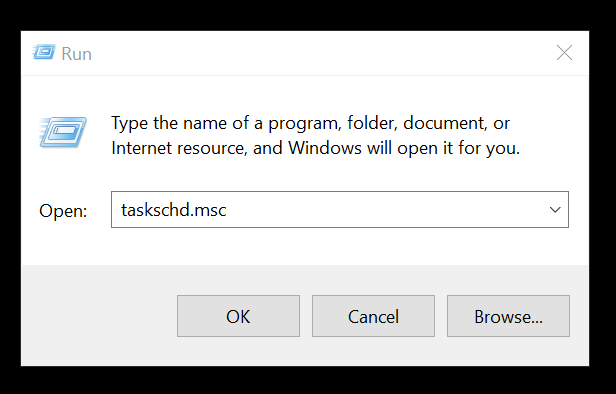
1. Search for and open Task Scheduler, or CTRL + R to run taskschd.msc
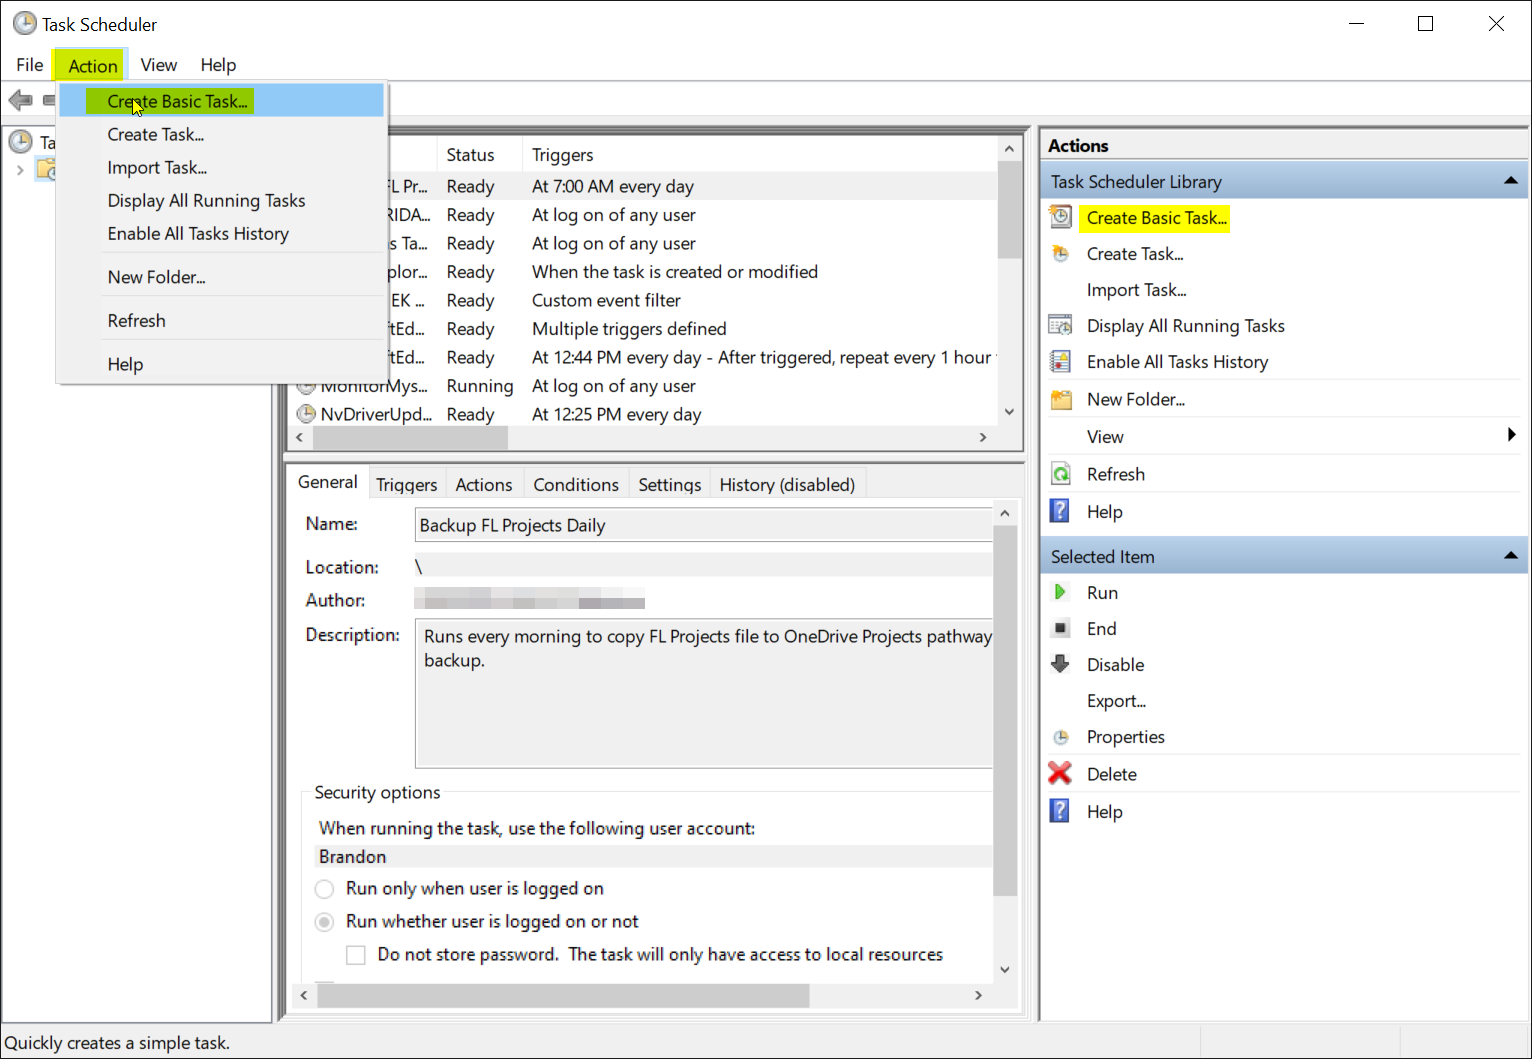
2. From the top toolbar, click Action > Create Basic Task, or click 'Create Basic Task…’ on the Actions menu on the right hand side.
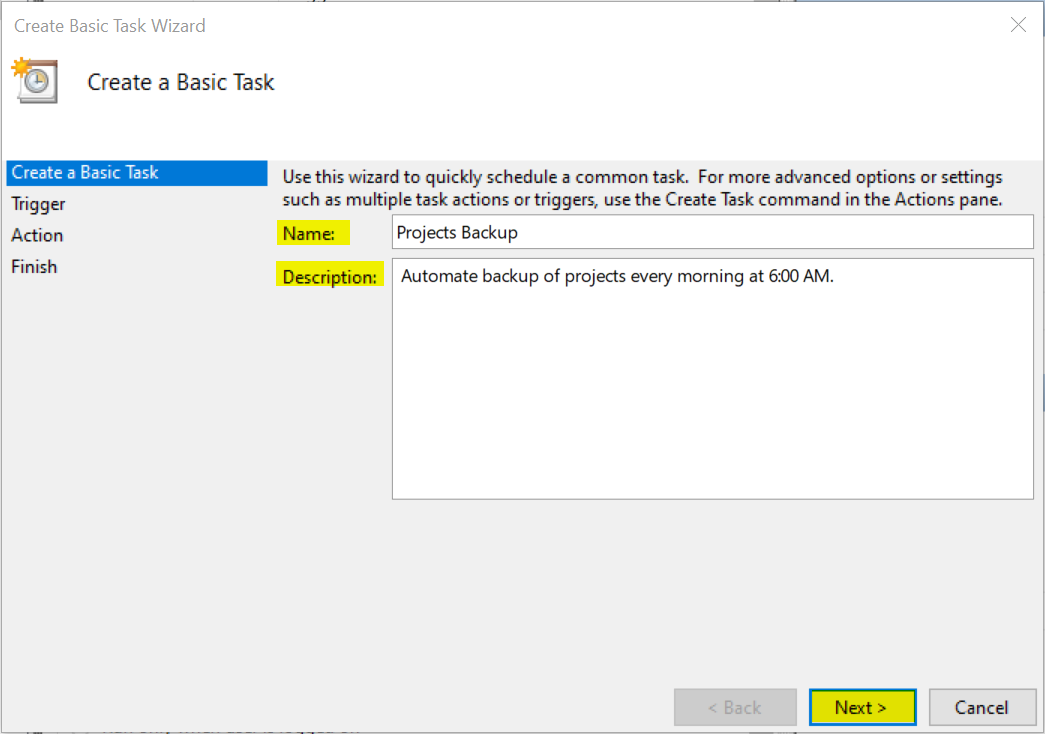
3. Create a Name and optionally provide a Description of your task, then click Next >.
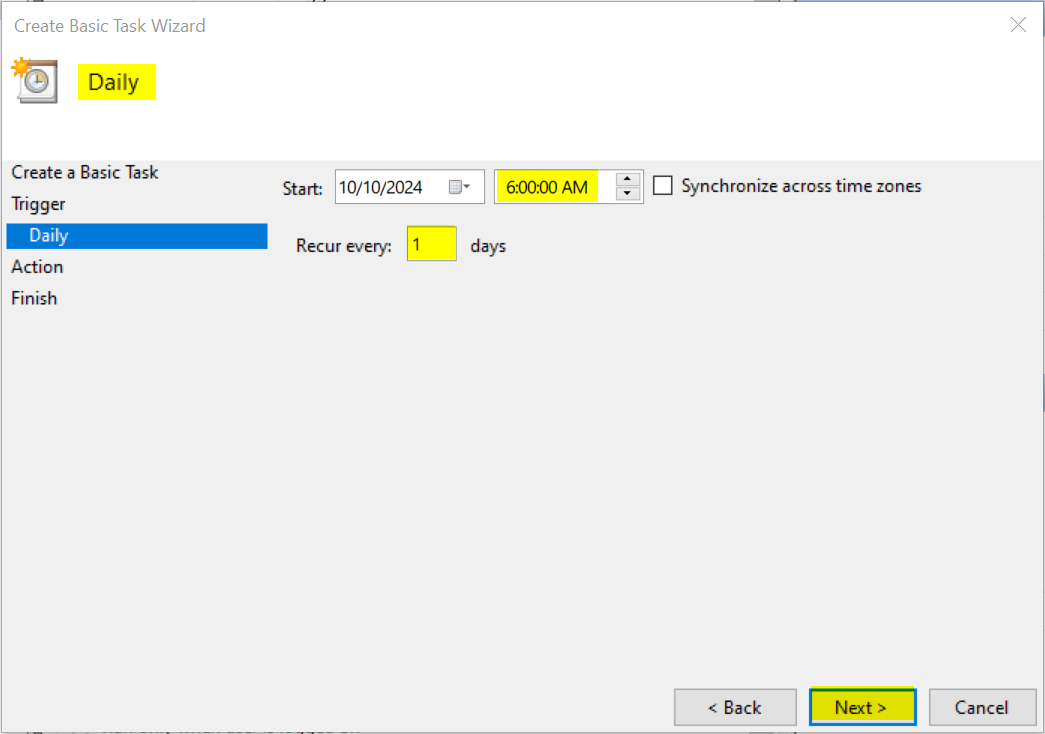
4. Define your Trigger frequency, such as Daily (set as flexible as you desire), then click Next >.
Select a Start Time that you do not expect to actively be working on the files you plan to backup to reduce chances of copy errors from files that are in active use. I personally choose 6:00 AM so that it’s early enough in the morning to not cross over with my active hours. Set to recur every 1 day(s) and click Next >.
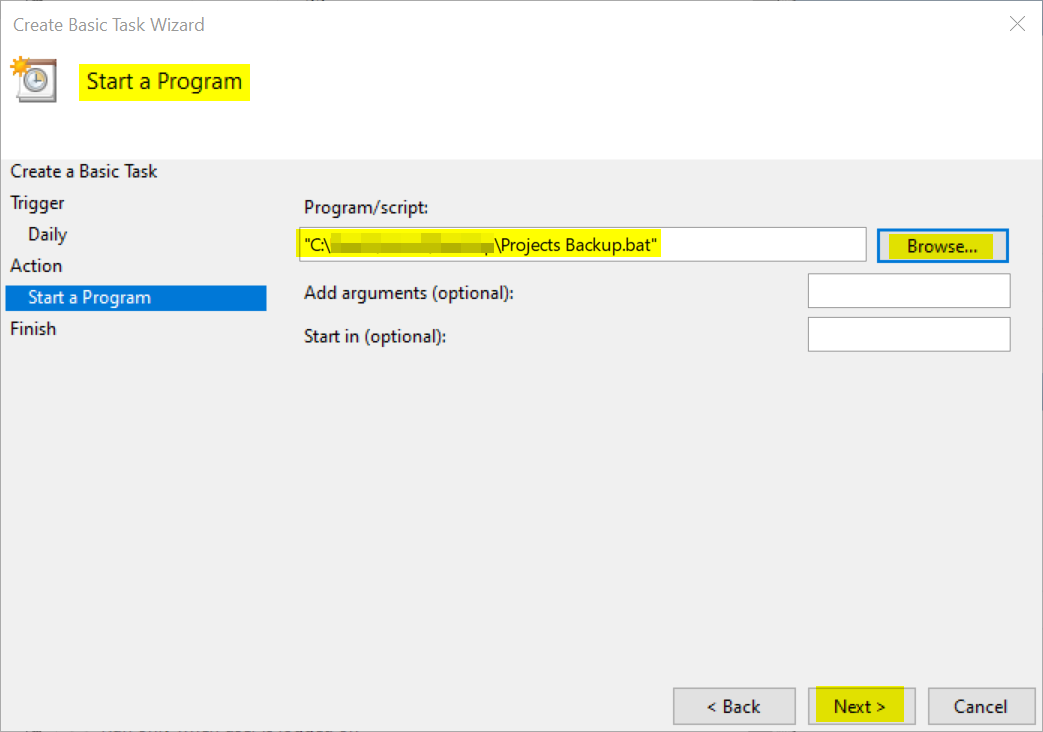
5. For your Action, select ‘Start a program’ and click Next >.
Browse to wherever you saved your .bat batch file after creating your ROBOCOPY script, then select your .bat file as your Program/script. Finally click Next >.
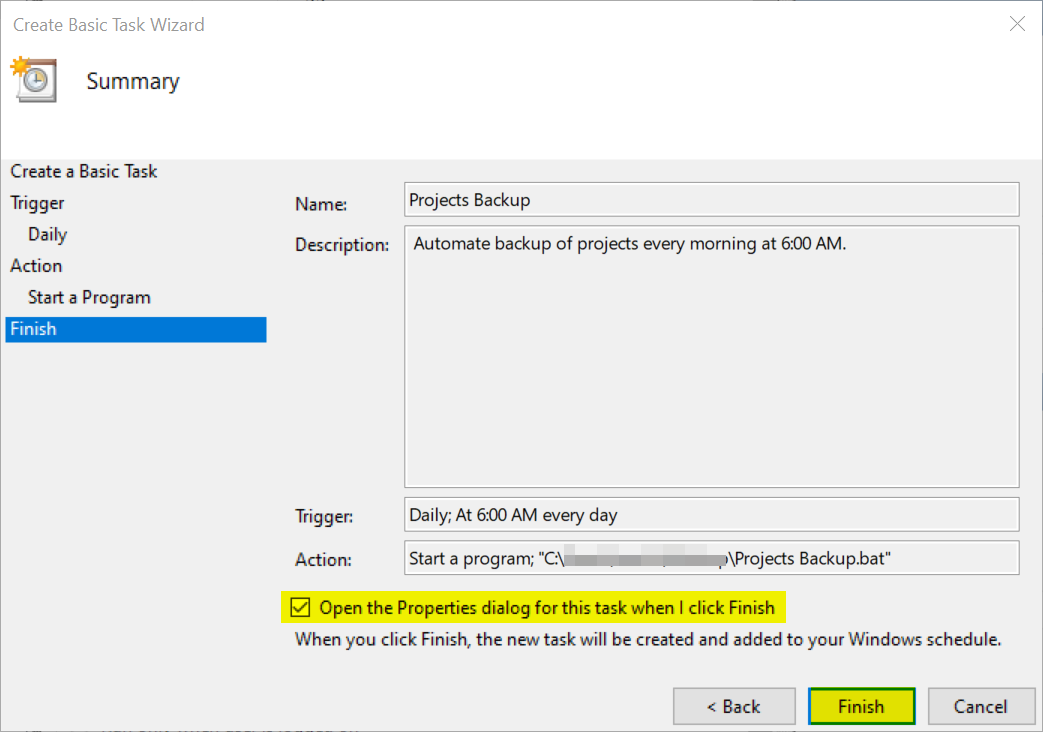
6. On the Finish page, check the “Open the Properties dialog for this task when I click Finish” box and click Finish.
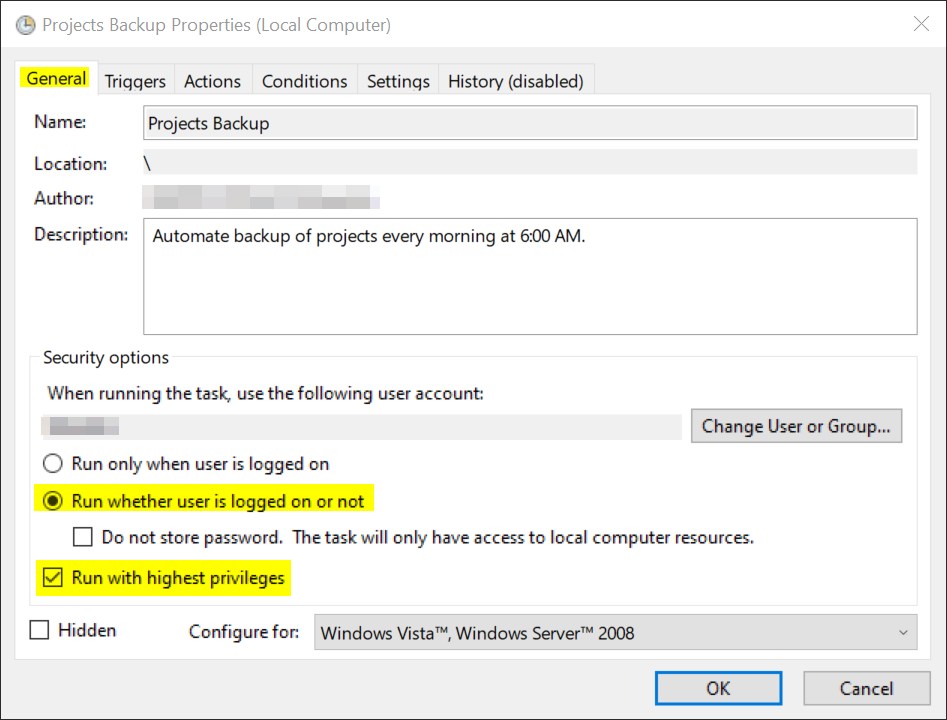
7. On the General tab, change Security Options to “Run whether user is logged on or not” and check the box to “Run with highest privileges”.
This setting allows the task to run as long as your computer is powered on, even if your user is logged out and the computer is idle/asleep/hibernating.
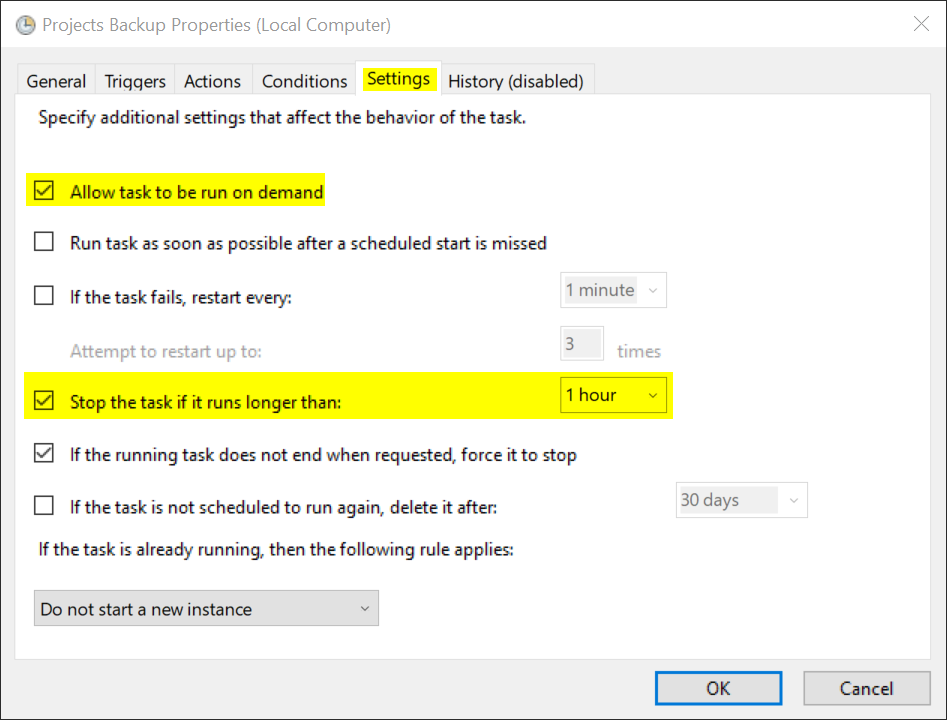
8. On the Settings tab, make sure boxes are checked for “Allow task to be run on demand” and “Stop the task if it runs longer than:”. This script should be very fast, I set it to the minimum to stop the task if it runs longer than 1 hour, then click OK to save changes.
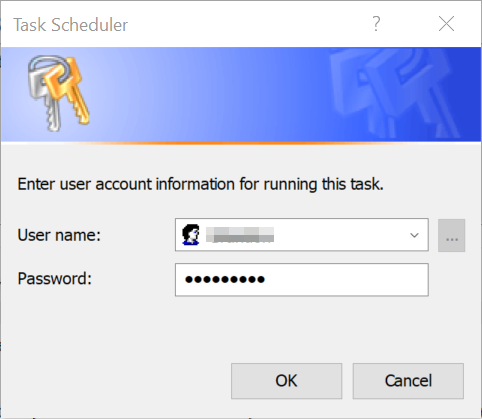
9. You may be prompted with your computer’s user name and password to save this task to run going forward. Enter your PC’s user and password* and then click OK.
*If your user does not have a password set, you may have to set up a password for your account, even if you still choose to sign in with another method such as fingerprint or PIN.
If successful, your task should now be created and scheduled and you should see the task in your library of other tasks.
Congratulations, you should now be set up for automated backups of any folder paths of your choice!
FAQs
What if I go over my cloud storage limit?
This is a legitimate concern. I highly recommend you prepare accordingly. First, check the size of the folders or paths you’re wanting to back up, and make sure they are not excessively large or beyond the scope of your cloud storage limit.
If you plan on backing up more, consider paying around $2 a month to get as much as 100 GB storage from any of the options on the market. It’s a small price to pay to have more peace of mind. Data recovery business charge hundreds to thousands of dollars just to attempt to recover data from a faulty drive, so this is a much cheaper option to pay for cloud storage.
If I deleted a file locally, would it delete from the cloud side?
No, this script is not set to exactly mirror. You can use the /MIR switch on ROBOCOPY to do that, but in my opinion, this leaves you more open to risk of data loss. The way the script is set up, if you delete files on your local side, whether on purpose or accident, the copies that were made to the cloud destination remain there. Mirroring instead of copying leaves you susceptible to ransomware attacks or other scenarios where your data is wiped.
Will this script create duplicates every day?
No, any file that is copied will skip files already in the destination folder with identical size and timestamp, meaning if a current copy already exists, that file is not copied again and duplicated.
Will updates I make to files copy forward?
Yes, if you edit a file, any edits you make will copy over and replace the cloud copy the next time the ROBOCOPY script runs.
What if I want to keep backups of older revisions?
If you want copies of various revisions as you edit ongoing files and projects, I recommend to do ‘Save as’ you work and create separate file names so you keep copies of various versions separate.
What happens if I rename or move my backup folder?
If you rename any of your folders or impact the paths in any way, the script will stop working. If you need to change the names of any folders or update paths of where you want things stored, make sure to update any batch files or scripts that you have that references these locations.
What if I lose my batch file or scheduled task?
Luckily, these aren’t too hard to rebuild out, but make a backup copy of your batch file and save that to the cloud. You can even export a Task Scheduler task as an .xml file to import onto another machine to quickly rebuild tasks (just make sure your .bat script path is referenced correctly if rebuilding).
Bonus Tips for Music Producers
Here’s some ideas of things that may be worth backing up:
Projects (and associated audio files such as recorded/sliced/chopped audio)
DAW Templates
Rendered song files
Plugin Presets/Synth Presets
Important Sample Packs/Kits
Custom-built tools such as Patcher presets or Piano Roll scripts for FL Studio, Ableton racks, etc.
Reference tracks for mixing/mastering.
I also recommend keeping living documents or a Google Doc/Sheet of various things to help serve as a refresher, in case you have such a catastrophe one day you are starting from scratch and need to remember what to re-install. I created the Music Plugin Library Manager to help you cover all of the following:
Spreadsheet of all VST instruments & plugins you’ve purchased with URL links to website to re-install.
List of Products with Serial Numbers/codes.
License keys or files for plugins that need these additional files (i.e. a .lic file).
List of any 3rd party Kontakt or Spitfire libraries you may have purchased or downloaded.
Final Thoughts
There are a lot of things that can go wrong when it comes to our personal data, so I hope that this approach helps you to come to a better solution, whether you choose to set up automated backups to a cloud location or to an external hard drive. Automating backups ensures that you don't have to remember to manually copy files, significantly reducing the risk of data loss due to oversight.
If you found this article helpful, please consider sharing it with others. I would love to hear what other solutions people have implemented for themselves and to hear of other tales of data loss.
Thank you for your time,
LETT