Stop Searching & Start Producing: A Music Producer's Guide to Sample Library Organization
A Great Library Comes With Great Responsibilities
The Case for Simplifying Your Workflow
Organization is a skill that comes to some people naturally, and to others, it is born out of necessity. For me, it was the latter. As I made my way through school, I rarely used binders or folders, color-coded dividers, highlighters, sticky notes, or anything to help give myself structure. I just threw all my books and papers into my bookbag and relied on a rough system for myself—math up front, literature toward the back, history here, sciences there. To anyone else, it looked like chaos (especially the crumpled papers I handed in when assignments were due), but to me, it was muscle memory and my own organized chaos. This worked well enough for my fledgling years, as I was only managing a limited number of materials or assignments at a time. Eventually, as the scale of my responsibilities grew, I realized the shortcomings of not investing the extra time upfront to better organize my work and resources.
When it comes to music production, I initially approached it the same way. Every plugin installed into its own pile, and every drum kit and sample pack went into its own big pile. Before long, my libraries grew to 100+ folders, and keeping track became overwhelming. Psychologists suggest that our brains struggle to keep track of more than seven things at once. Anything beyond that—like an unorganized library of hundreds of plugins or samples—can quickly become information overload.
You might think, I don’t need to remember every sample or plugin; it’s all on my hard drive, and I can search for it as needed. While that’s true, this approach often costs you time and creative momentum. The question isn’t whether you can find your sounds—it’s how much time you can save long-term by simplifying, organizing, and streamlining. In today’s world of endless distractions—from buzzing phones to countless browser tabs—the last thing we need is to waste precious creative energy navigating through folders or plugin dropdown menus that rival the length of the Cheesecake Factory menu.
One way to combat this chaos is by leveraging the concept of chunking or clustering—grouping items together in meaningful ways. The best part? You get to decide how to cluster your information based on what works best for your brain. While this process can initially feel overwhelming and may take a full afternoon of work to get started, the effort pays off in dividends. Once you have a system in place, maintaining it becomes almost effortless and secondhand nature. You can simply store your new samples or plugins in their respective categorical "drawers" based on your chosen organization system as you acquire more.
While you can borrow ideas from how I structure my own samples, the key is to develop a system that aligns with your memory and workflow. Organizing your libraries is not a one-size-fits-all process.
Keep in mind that your libraries will continue to grow, and organizing them is an ongoing process of sorting, re-arranging, and adjusting as your needs and mental connections evolve. Whenever you find yourself frustrated while navigating folders or dropdown menus, take it as a signal: there’s likely a better way to organize your libraries. My hope is to help the disorganized among us take back control and create order in the face of entropy.
Sample Organization Basics
Let’s begin first by tackling our library of sounds. I will use the term sample frequently, but over the course of this blog article, I’m referring loosely to any audio file that you could use for the purposes of music production; so this is not limited to the concept of “sampling” pre-existing music. Throughout this article, “sample” refers broadly to any audio file used in music production: one-shots (kicks, snares, drum hits), loops, FX, vocal recordings, foley, and more.
As you accumulate more and more samples and sounds, you will find that it becomes very tough to find samples simply off of the title of the folder when listed alphabetically. It helps to create a system for yourself to divide your samples into categories such as genre or use case. I don’t think I’m sharing anything here revolutionary by suggesting that you use categorization, but I do want to share some examples of how I use chunking or clustering in my own sample library with some bonus tips that you may not have previously considered.
Let’s first start with a screenshot showing an example of my sample library, and how I use a combination of special characters (!, @, #, $, etc.) to my advantage for both sorting and clustering:
Use of Special Characters to Both Sort and Cluster
Use Special Characters
This is a trick that I have picked up that has become a go-to in my life inside and outside music production for digital file organization. Special characters can make your folders more accessible. For example, add ! to bump a frequently used folder to the top or use symbols like # to group genre-agnostic folders (e.g., FX, Vocals). Customize this system to fit your workflow and aesthetic—try _ underscores or $ cash signs to suit your style.
Just keep in mind, file and folder names can't contain any of the following characters: \ / : * ? “ < > |
Cross-Genre Categories: The Power of Use Case Folders
There are some areas of music production that I find appropriate to chunk together in a category, but I feel they are much too broad to fit any one genre or type of song or project. I consider these areas to be Use Case categories. A "Use Case" folder contains sounds that work across genres, like vocals, FX (risers, sweeps, impacts), and foley & found sound (nature field recordings, footsteps, phone rings, clocks ticking, etc.). These categories are broader than any one style, making them versatile and therefore worth making accessible for every project.
“Genres Aren’t Real”, Yet They Are Incredibly Useful
Genre classifications may feel limiting, but they’re invaluable for locating specific sounds. For instance, I might look for a trap kick, a dubstep snare, and a synthwave tom all in one session. Grouping samples by genre helps me quickly differentiate between a tight trap kick, a rumbly techno kick, or a boom-bap kick that knocks. Customize your genre categories to reflect the sonic attributes most important to your workflow.
From my earlier screenshot, you may see that I’ve got quite a spread of genre breakdowns. While I have a pretty large breakdown already, it could be broken out even more. I have tried to lump similar genres together, generally by drum type as that’s the makeup of most of my personal samples. So I have genres like “Drum and Bass & Jungle” lumped together, “Synthwave & Cyberpunk” together, and so on. While I’m sure there are people out there who can argue every distinct difference, what matters to you is making connections that make sense in your mind to help you browse to find relevant samples faster.
Notice in the screenshot below how I chain these ideas or sorting and chunking together. I carry forward this idea of using ! to bump my favorites to the top in sorting so that I can find and click these packs faster:
! to Bump my Favorite Folders Within Folders
Pro Tips: Top 5 Tricks for Optimizing Your Workflow
1. Remove Redundant Folders
There’s no need to open a sample pack only to find another folder with yet another variation of the sample pack name (please stop doing this sample pack creators). Eliminate unnecessary sub-folders to save clicks.
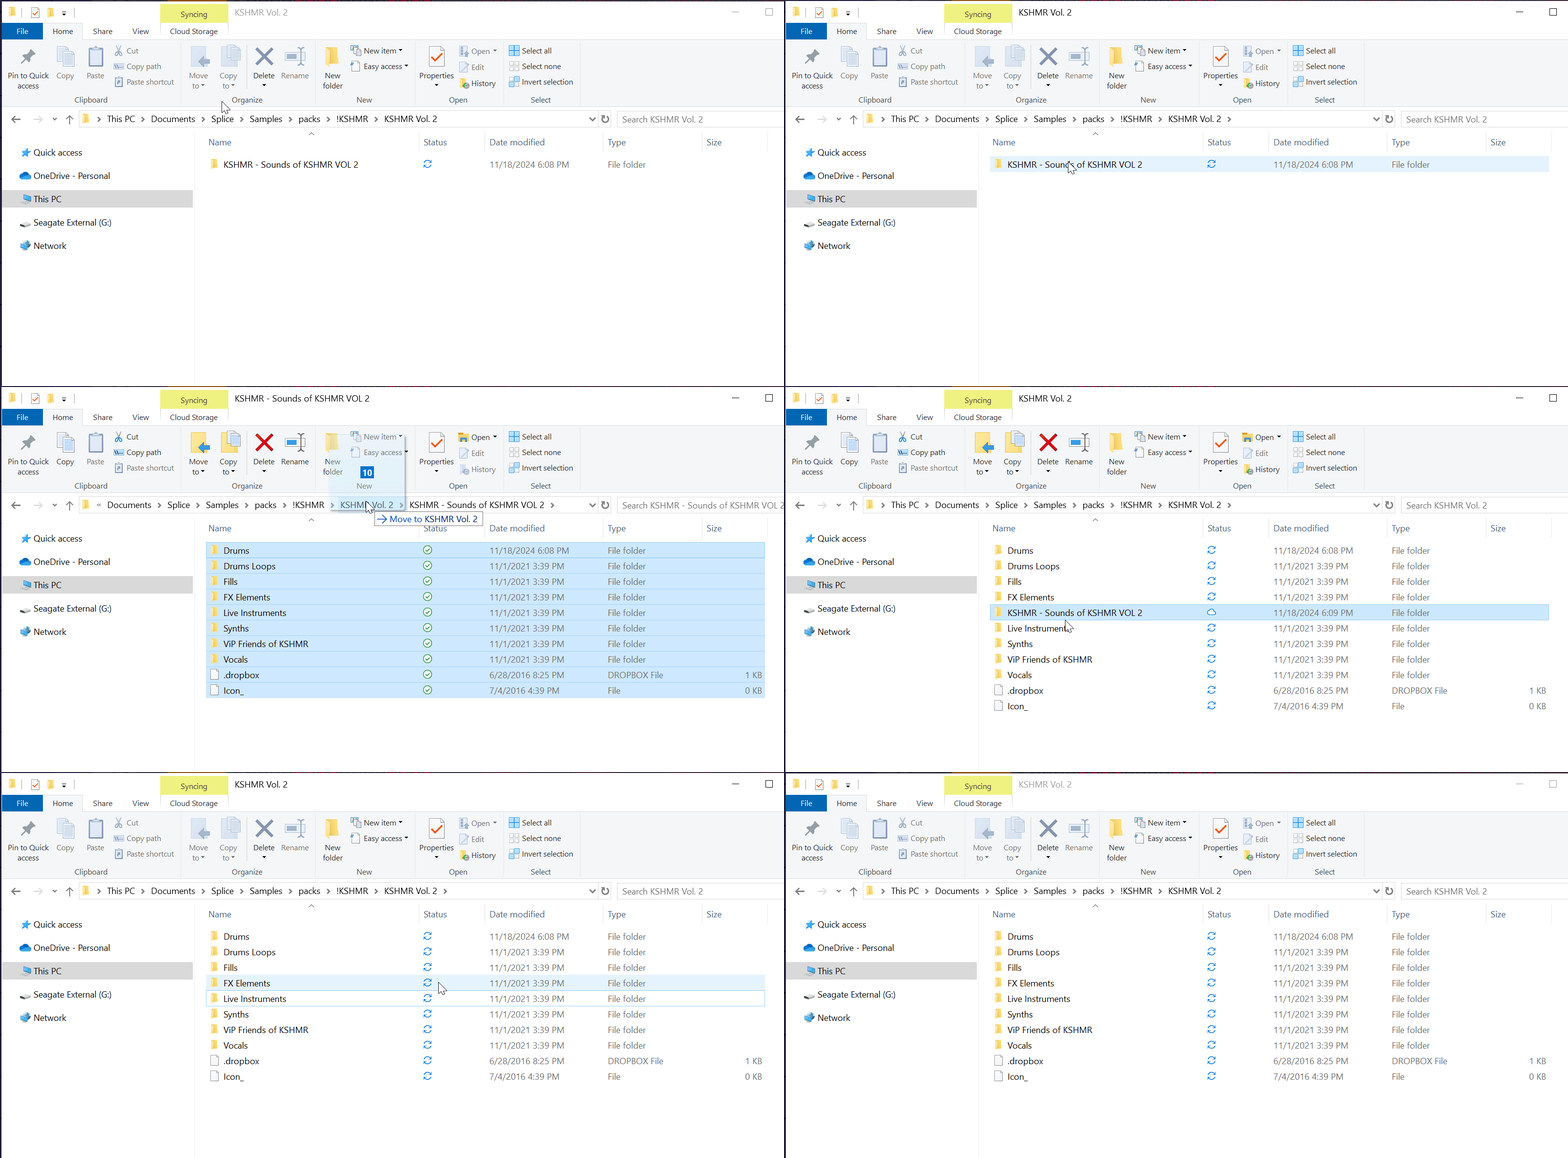
For example, I move all samples from "KSHMR Vol. 2/KSHMR - Sounds of KSHMR VOL 2" into the parent folder “KSHMR Vol 2.” and delete the now-empty folder.
Move Samples to Parent Folder and Delete Redundant Pack Name Folders
2. Save Yourself The Clicks From Deeply Nested Subfolders
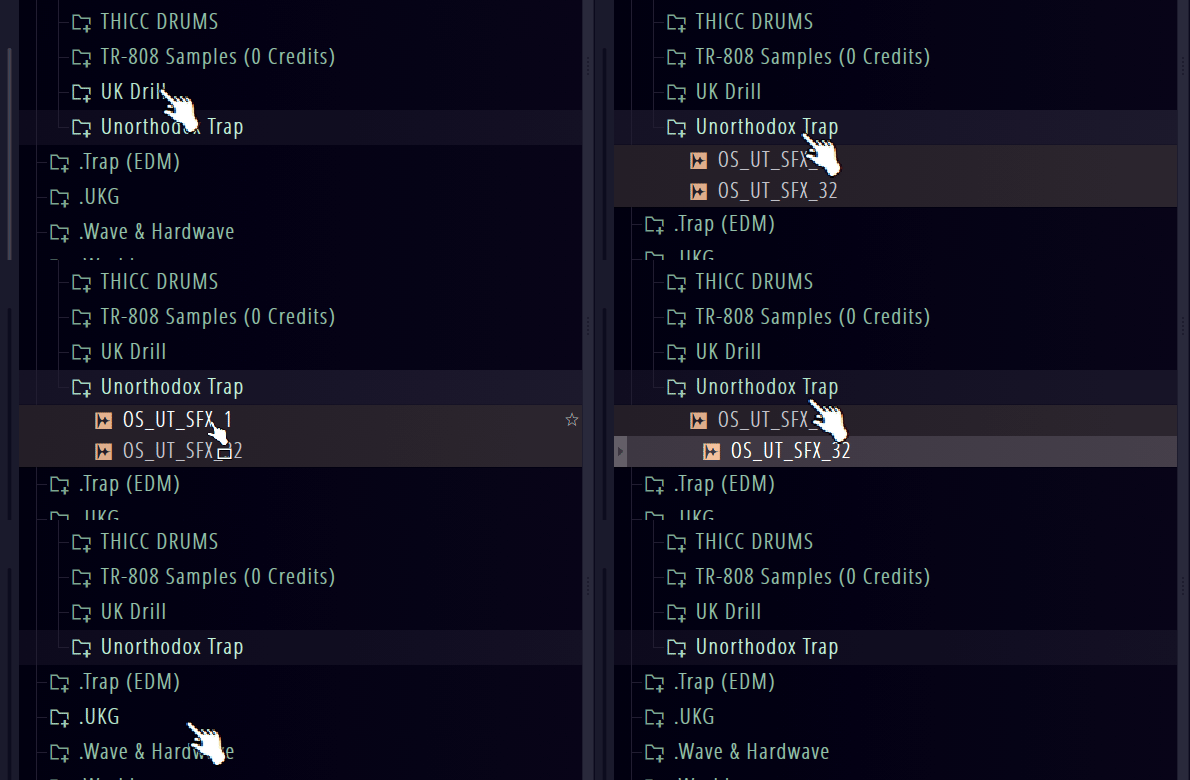
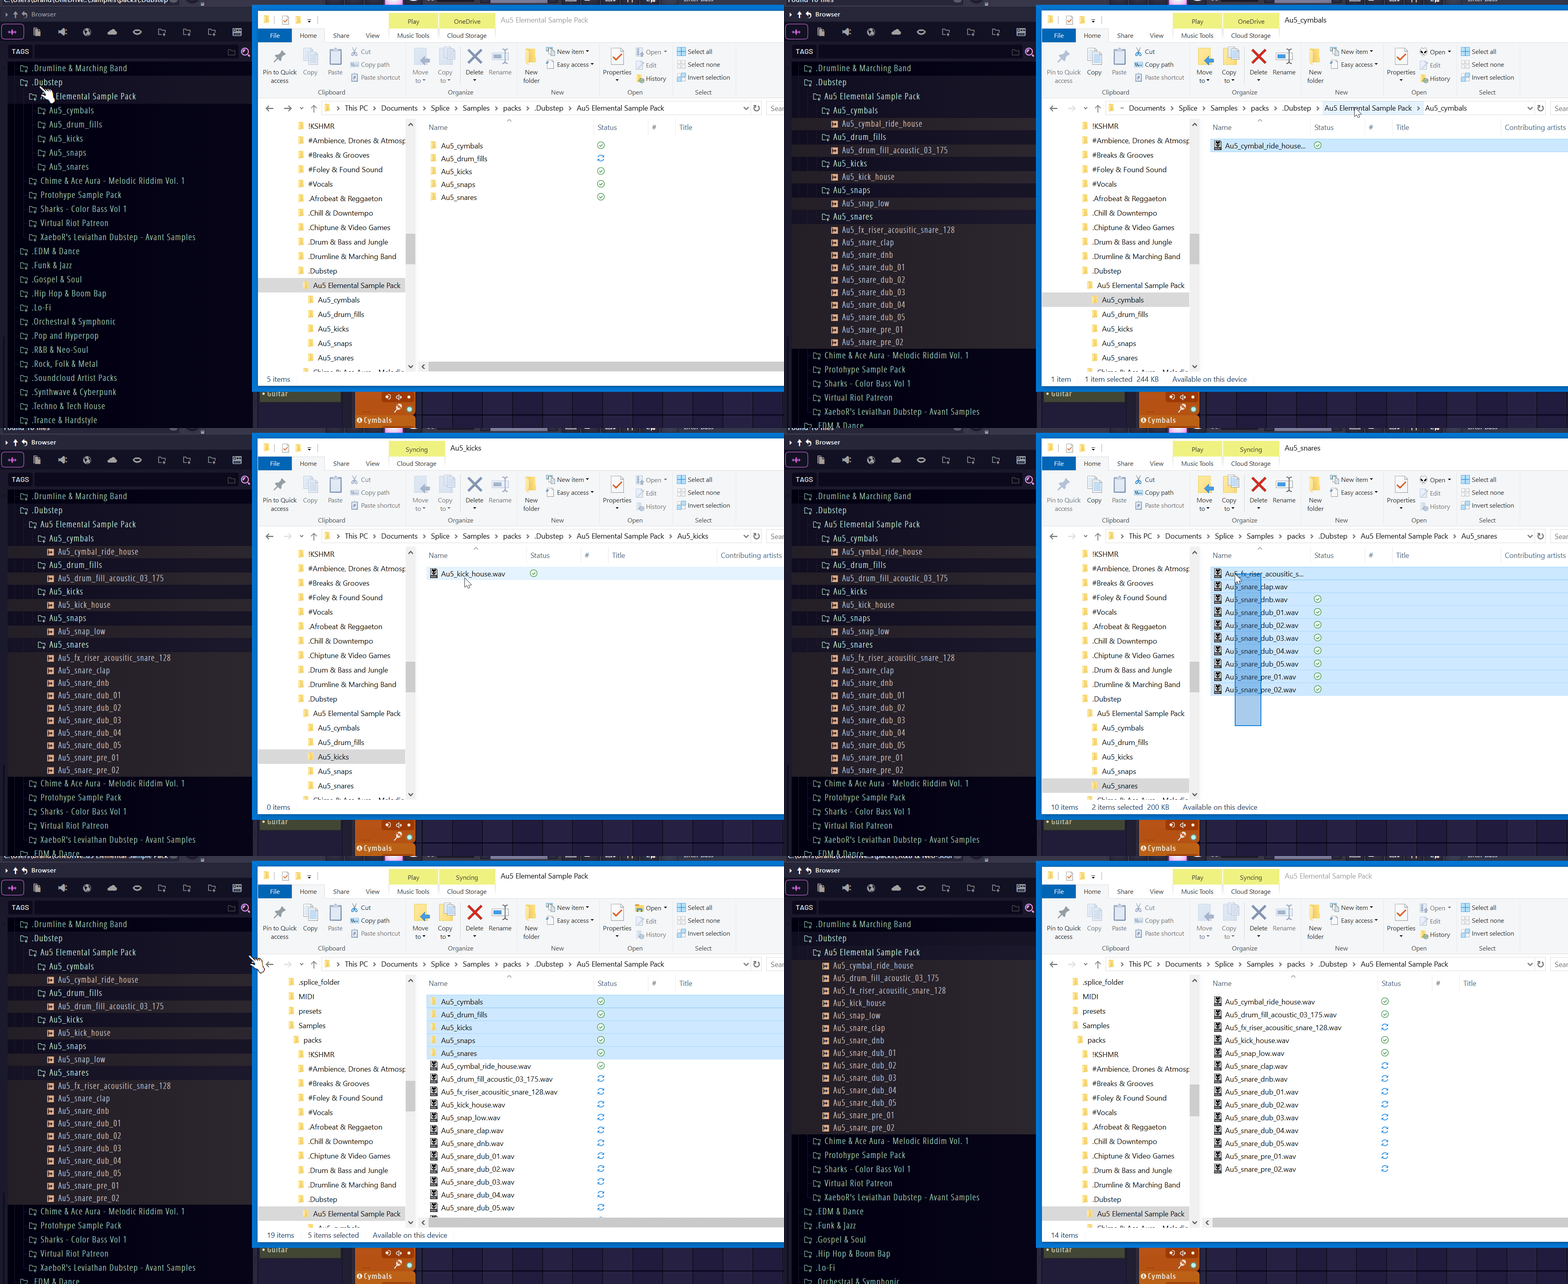
When downloading samples from services such as Splice or Loopcloud, those individual samples may install into a folder structure that’s 3 or more sub-folders deep, even though you were only needing a handful of samples from that pack. For deeply nested folders, move frequently accessed samples closer to the root.
Follow along with the below screen captures as an example for optimizing packs for fewer clicks.
Too Many Clicks
Move Samples Into Parent Folder
Less Folders = Less Clicks
3. One Folder May Be Enough
Separately labelled sub-folders are useful when you have many samples within a single pack, but having individual sub-folders for only a few samples each may be less optimal than just bringing all of the samples to one folder, especially if the individual sample file names are clearly defined and easy to categorically understand. Avoid over-categorizing. For instance, combining open hi-hats and closed hi-hats into one folder can streamline navigation without losing clarity given that you can differentiate them by the sample file names.
Sometimes you have to find a good balance between categorizing too many files and over-categorizing too few files.
Simplify To One Folder If There Are Not Too Many Samples
4. Include Tempo Information for Drum Breaks/Loops Folders
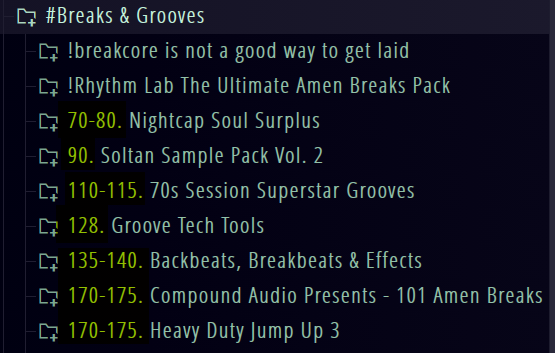
Add Tempo information to folder names where applicable to help sort and quickly search based on your current project BPM. If you’re working on a dubstep track around 140 BPM or a Drum & Bass project around 170-175 BPM, it can be helpful to more quickly identify which drum break packs or folders already have drums that are within ±20% of your current tempo. There’s no rule saying you can’t stretch any break to any tempo, but the more you stretch or squeeze a break, the more grainy or artefacts could occur (this could be intentional).
Add Tempo Ranges to Help Sort Break & Groove Folders Further
5. Create a Dedicated Sample Folder to Quick Load Templates
If you use a template file in your DAW pre-loaded with your favorite drum samples, synths, and plugins, you might notice longer load times. To streamline your workflow, it’s a good idea to keep your template as lightweight as possible. However, if there are certain sounds or samples you consistently reach for, including them in your template can help you stay consistent and develop your signature sound.
To optimize loading, gather these frequently used samples into a single sub-folder labeled something like !Template Fast Load to ensure it appears at the top of your DAW’s search order. Place this folder in a location your DAW can quickly access, such as its stock sample pack directory or as a high-priority folder in your DAW's extra search paths.
Here’s an example from my setup in FL Studio, where I’ve prioritized a quick-load folder to ensure my essential drum samples are quickly accessible.
Template Fast Load Folder bumped to the top of my Extra Search Folders in FL Studio File Settings
This approach can significantly reduce load times, especially if your DAW normally searches through a large library. For instance, my setup avoids scanning nearly 100GB of files across 10+ distinct sub-folders, saving me up to 30 seconds every time I start a project from scratch.
What About Sample Management Plugins and A.I.?
Some of you may have heard about sample management tools like the free ADSR Sample Manager, AI-powered libraries like Waves COSMOS Sample Finder or XLN Audio XO, or the compatible app versions of subscription models like Splice or Loopcloud, which you can integrate with your DAW. I like to think of these tools as complementary tools to an organized library rather than a fix-all solution.
These tools use tags, metadata, or AI-powered clustering to categorize sounds by characteristics like frequency or duration. While helpful, they aren’t perfect—genre differentiation and very specific searches may still require manual organization. Use them alongside a well-organized library for the best results. When companies claim their sample manager is AI-powered, they are likely referring to machine learning methods such as K-means clustering, where you are able to analyze unlabeled data and group n number of data points into k number of clusters.
Below is an example of my sample library being scanned in by Waves COSMOS, where you can see how it clusters my samples into different instrument types.
Waves COSMOS Clustered By Instrument Type
While the results of the clustering is pretty accurate and can be a fun way to explore a sample library, it still lacks in a few areas, so I’ll try and break out a few pros and cons when dealing with sample managers:
Pros:
Can spark creativity by browsing samples at random.
Provides a visually engaging way to connect to your sounds.
Can sometimes hone in to search further by tags.
Cons:
Typically costs money.
Does not always help you differentiate samples for genre (i.e. techno kick vs. trap kick vs. acoustic rock kick).
Not always helpful in honing in on very specific sounds.
May use up more CPU and memory in utilizing a plugin to browse files instead of your standard built-in file browser.
I’m not here to sell you on any sample manager plugins or tools. Sample managers can spark creativity and provide useful visual tools, but they are no substitute for a well-organized library. Use them to explore your sounds, but invest time in creating a system that works for you.
Conclusion: Building a System That Works for You
Organizing your sample library isn’t just about saving time—it’s about creating an environment that inspires creativity and reduces friction in your workflow. By implementing strategies like using special characters, categorizing by genre and use case, and keeping your templates optimized for quick access, you can spend less time searching and more time producing.
Remember, there’s no one-size-fits-all approach to organization. Your system should reflect your unique workflow and make sense to you. Start small, tackle one part of your library at a time, and adapt as you go. Over time, you’ll find that a well-organized library not only speeds up your process but also unlocks new ideas by making your sounds more accessible.
If you’ve found these tips helpful or have your own strategies for sample organization, I’d love to hear about them! Share your thoughts in the comments or connect with me online—I’m always looking to learn and exchange ideas with fellow producers.
As always, thank you for your time,
LETT


